Monday, June 10, 2013

Stuffed mushrooms


Zach has been gone for over two weeks, on the plus side we only have two weeks left! We have defiantly been keeping busy! With discovering the Galt Market with My lovely cousin June, and the Claudius, where I found squash blossoms (recipe to come.) To going up to the moutons to escape the heat (109F) with my other lovely cousin Lily and Luke.
Ivy having way to much fun with Chassis leash, and the swimming hole!
 
 I have not been cooking, but making a lot of salads with random things around the house and shakes the last few days. 

Today with the temps in the 80s I can now think about being in the kitchen, without the fear of melting! I found this great recipe for Parmesan & Herbed Quinoa Stuffed Portobello Mushrooms. It sounded like the perfect earthy/ healthy meal I needed!
 Recipe and photo from E.A.T

      Ingredients:

  • 2 large Portobello mushrooms
  • 1 cup of prepared quinoa (after you cook the quinoa allow to cool and incorporate thyme, salt, pepper, and diced cucumbers).
  • Olive oil
  • Thyme sprigs and leaves
  • Salt & pepper
  • Parmesan cheese

Preheat oven to 400 degrees. Wipe your mushrooms with a damp paper towel to clean. Remove the stem, place on a baking sheet and drizzle mushrooms with olive oil. Sprinkle with a pinch of salt and pepper, then transfer the mushrooms to the hot oven to roast for 5-7 minutes.

Remove from oven and scoop quinoa mixture into the mushroom caps, add a pinch of fresh thyme leaves and grate fresh parmesan on top before returning to the hot oven and roasting for another 5 minutes or until the cheese is melted to your liking. I like to toss a couple whole sprigs of thyme onto the baking sheet at this point to use later for a garnish.

Remove and serve with that freshly roasted sprig of thyme.


 My yummy mushrooms! They look better in real life...

This was very easy! The hardest part was waiting for the quinoa to cook. I didn’t not have fresh thyme so I used my fresh oregano instead, and it was still delicious! I was also thinking that rosemary would be really good in it! I ate both mushrooms, so it might be a good appetizer, or pared with other food if you’re making it for guests.  The pictures on the website are really great too, they are what inspired me to make it! I just wish I grew the mushrooms myself. I really hope you like this recipe as much as I did!


Any questions or comments please let me know! If you find a recipe on pinterest you would like me to try first, don’t be afraid to ask!  

Sunday, June 9, 2013

Dog food and smoothies


I have been learning that I am not the best blogger! I don’t always have the motivation to sit down and write about what going on! On the pulse side however I still love to cook sooo I can still write about the wonderful world of Pinterest and some of the amazing edibles I find on there!

               I am not as big of a fan of cooking for myself, but a girls got to eat! With my plan to try and eat healthy I have been making a plethora of smoothies! They are delicious, nutritious, and most importantly quick and I can eat them while playing with Ivy!


               I am a mom who lets Ivy crawl around and explore, as long as she won’t get hurt. Today she found Chassi’s water bowl…
she thought it was sooooo much fun! Just splashing around and have a good ol time! Chassi however was slightly distressed, she would run to me and then back to the Ivy and back and forth.
 
 After the water was gone she moved onto the food bowl…
 
 Chassi was trying to eat her food quickly, but that didn’t stop the lil miss. She grabbed a handful of dog food and sucked on it for a while…
 
this is a girl who hates peaches… but likes dog food?  When she eventually spit it out Chas was right there to clean it up! At least we buy the expensive dog food right?

               The smoothie today claims that the fat will just fall off! Who wouldn’t want that?  All you have to do is blend together:

This is the vibrant green smoothie from The Beautythesis
Two handfuls of baby spinach

1 apple

1 banana

1 cup of yogurt

5 strawberries

 ½ and orange

 Mine was defiantly not as vibrant, I don't know if that is good or bad?
 
I didn’t have oranges so I used simply orange juice. It was very easy and tasted quite good! I would use a frozen banana so the drink is colder, but it my own personal preference. I don’t know for sure if this will make the fat melt off, but its good and obviously good for you!  
Thanks for checking it out! if you have any questions or comments please let me know! I will respond ASAP! If you have a Pinterest recipe you would like me to try please feel free to ask!

Monday, June 3, 2013

A trip to the Zoo and Brownies too


Today is day 6 of Zach being deployed, things are still running as usual. Chassi (my dog) is happy she gets to sleep in bed with me every night… To keep my mind off missing Zach we just try to stay busy!

Today my lovely cousin Juniper Invited Ivy and I to the Sacramento Zoo! This was Ivy’s first trip to the zoo and I definitely think she liked it! Well she loved watching little Claudia run around! I also had a great time hanging out with my cuz, it’s always a good time when we hang out! One of the great thing about going to the zoo, is that you walk all-around, which is great exercise that you don’t even realize you’re doing! You get to see so many cool animals, and you’re outside all day! This definitely needs to happen more often!

Claudia and Ivy
 
This evening I was craving something sweet! Trying to stay healthy and eating sweets is not always the easiest thing, and O man can I make desserts! I went to my trusted Pinterest for ideas… I found some really delicious ideas, but not so healthy… Then I stumbled on Jillian Michaels brownie recipe, she’s the guru of being fit! I might try her work out videos some day when she stops scaring me… I will admit I was slightly hesitant on this however, I love brownies, and I’ll be honest I think box brownies are the best! There are very few desserts that I think are better from a box, but as of now I still think box is best with brownies! That however did not stop me! I still wanted a healthy dessert!     

This was the image that popped up on Pinterest
 

Fudge Brownies

Ingredients

Olive oil spray for the pan

2/3 cup mild honey, such as clover or orange blossom

1/3 cup natural unsweetened cocoa powder

1/2 cup white whole-wheat flour

1/4 teaspoon baking powder

1/4 teaspoon baking soda

1/4 teaspoon salt

               1/2 cup unsweetened applesauce

               2 tablespoons olive oil

               1 large egg, at room temperature

               3/4 teaspoon pure vanilla extract

               Directions

1.      Preheat oven to 350F. Spray an 8-inch square pan with olive oil spray

2.      Place honey in a glass measuring cup. Microwave until honey is runny and just bubbling, 45 to 60 seconds. Add cocoa and stir with a fork until well combined. Let cool to room temperature

3.      Meanwhile, in a small bowl, place the flour, baking powder, baking soda, and salt. Whisk until well combined.

4.      In a large bowl, combine the applesauce, oil, egg, and vanilla. Whisk together until well blended. Add the honey- cocoa mixture and whisk until smooth. Add the flour mixture to the liquid mixture and stir until no traces of flour remain. Scrape the batter into the prepared pan.

5.      Bake until the surface looks dry around the edges of the pan and a toothpick inserted in the center comes out with moist crumbs clinging to I, about 25 minutes. Do not over bake. Place the pan on a cooling rack and let cool completely before slicing into 16 squares. (Store the brownies in an airtight container at room temperature for up to 3 days.)
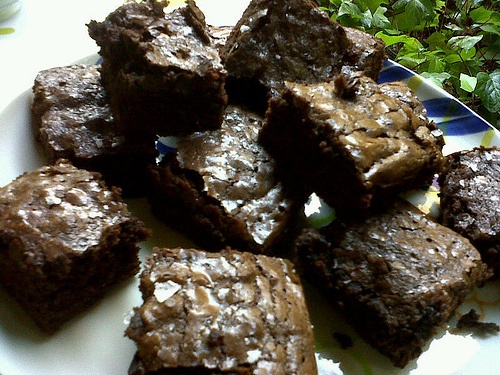
Here is my result ( this was taken a few days after they were made) 
 

         When they came out of the oven I was excited to try them! I’ll be honest not my favorite… I only had normal honey so they had a very strong honey flavor! The texture was also odd… I don’t really know how to explain it, not fudgy but not fluffy either. And not that perfect fuggy fluffy texture you want from a brownie… a weird spongy texture I guess. I will not be trying this recipe out again! But with cooking you always find things you don’t like, but that means I am now on a hunt to find a brownie that can compare with the box!

*They did get a bit better the next day, and I did not refrigerate.

       Thanks for stopping by! I’ll keep you posted on the elusive brownie hunt! Please feel free to leave any questions or comments, I’ll make sure to get back to you ASAP!  

Friday, May 31, 2013

It's a Power Muffin kind of Day


Today is day 4 of Zach being gone. It is starting to feel longer than just a drill weekend… but we have be apart longer so this is nuthin right? I was hoping to post a post every night… not doing as well as I hoped. Ivy is all about the early mornings, and I am all about trying to nap… “Trying” is the key word. Like most however we just keep on keeping on.  

Today is a bit gloomy so during Ivy’s nap I decided to cook! I’m beginning to realize this blog is more about cooking and less about the other mog pog of things I was originally thinking. The photos I take of my food are not artsy or designed to make the food look perfect. I want to show what it will probably look like to the average cook. But I will put the pictures that inspired me so you also can get inspired!

I am very addicted to Pinterest right now, so I am trying to eat healthy using Pinterest inspired recipes! Please feel free to request a recipe of you would like me to take the plunge first!

Today’s recipe is brought to you by Domesticated Academic
 

Power Muffins

Makes 12 regular muffins (depending how full you pack your muffin tin)

Ingredients

  • no-stick cooking spray or muffin liners
  • 2 cups all-purpose flour
  • 1 cup oats–quick or regular oats, plain
  • 2/3 cup sugar
  • 1 teaspoon baking powder
  • 1 teaspoon baking soda
  • 1/2 teaspoon salt
  • 12 ounces honey nonfat greek yogurt or 1 1/2 cups (Chobani)
  • 2 large eggs, lightly beaten
  • 4 tablespoons unsalted butter, melted and slightly cooled
  • 1 teaspoon vanilla extract
  • 1 cup fresh blueberries


  1. Heat oven to 350°.
  2. Coat muffin tin with cooking spray or liners.
  3. Combine flour, sugar, oats, baking powder, baking soda and salt in a bowl.
  4. Combine yogurt, eggs, butter, and vanilla in a second bowl.
  5. Fold yogurt mixture into dry mixture; stir to combine completely.
  6. Gently fold in blueberries.
  7. Spoon into muffin tins.
  8. Bake until top is golden and springs back when you gently touch it, 20-25 minutes
 
    My power muffins!

I found this recipe to relatively easy and delicious… I do however eat more than one in a single sitting… I love muffins, but I have a hard time knowing how much batter to put in each section. They always either way to low or overflowing, but with the batter being thicker than usual I was able to make them almost perfect.. With a few low ones. If you want a healthy muffin that’s not to sweet this is a great recipe! If you’re a person who’s not a fan of blueberry’s don’t be afraid to substitute a different berry!

Thanks for joining! Any questions or comments please let me know!       

Babys love salad!


Today is day 3 of Zach’s deployment, my day today was not very eventful. It turned into a late night last night and Ivy thought it would be great fun to wake up at 5am…. I’m trying to drink green tea rather than coffee, due to all of the extra health bonuses… which left me with a lovely headache..

After my power nap I did feel slightly livelier, so I put Ivy in the Baby Bjorn and put the leash on Chassi and we went for a nice stole around the neighborhood. Being outside always makes me feel better, I forget that some times. I really think we need to go on a camping trip! It has been way to long!

I planted my tomato plant today in that Topsy Turvy thing,

 I sure hope it works! You may be asking yourself why I don’t plant it in the yard, because I do have a yard now. Chassi (my dog) is a pit of a digger and if she want that plant it doesn’t stand a chance! So at the moment while she’s learning how to be in a yard, my tomatoes are going to have to try and grow upside-down. I also planted my rosemary seeds today in a mason jar. When they start growing I think I’ll trans plant them in the front yard. I will also take pics when its more then dirt in a jar. 

For my dinner tonight I found this great recipe on Pinterest   


Photo from The Diva Dish
Lemon Quinoa Cilantro Chickpea Salad

Ingredients:

1 Cup dry quinoa

2 Cups Vegetable broth

2 Cups spinach

½ a bunch cilantro

1/4 Cup onion

2 cloves garlic

1 can garbanzo beans (drained and rinsed)

1 ½ Cup cherry tomatoes cut in half

2 avocados diced

Dressing:

Juice of 2 lemons

2 teaspoons dijon mustard

2 Tablespoons olive oil

1 teaspoons agave nectar

1/2 teaspoon cumin

salt and pepper to taste


Directions:

1.     Make your quinoa first. Turn on the heat to medium high and let the quinoa come to a boil. Once it boils, reduce heat to medium/low and let quinoa simmer. Stir every so often, and cook quinoa for about 20-25 minutes just until the liquid absorbs. You don’t want it completely dried out, so when there is just a TINY amount of liquid left in the pot, remove it from heat and put a lid on it. Set it aside, and make the rest of the salad.


2.     In a food processor, add spinach, cilantro, onion, and garlic cloves  


3.     Process until they are finely diced. You can do this by hand as well if you don’t have a food processor.


4.     Add to a bowl, next add your chickpeas and stir until everything is combined and coated. If the quinoa is cooled, you can add it to the chickpea mixture.


5.     Make your dressing by whisking all the ingredients together. Pour over salad, and mix until combined. Add in tomatoes and avocado and mix. Set in fridge for about 10-15 minutes before serving so the flavors set.


 I was going to take a nicer pic but Ivy really wanted to be in it!


I thought that this was a delicious salad, and very healthy! Ivy seems to like it too! It took a little bit of prep time, and if you don’t have a food processor it will take much more, but it is very refreshing for the summer. I was also surprised by how quickly it filled me up! It can sometimes take a lot to fill me up, I mean I’ve been known to eat a whole box of cheez-itz in one sitting…

Thanks for visiting! If you have any questions or comments please let me know! Or if there is a recipe you would like me to make, don't be afraid to ask!

Monday, May 27, 2013

Farmers Market and A Strawberry Log


Today is day 2 of Zach being gone, and it's Saturday so Ivy and I headed up to the Sunrise Mall Farmers Market! My father in law, David, has a booth up there and I always love going to the Farmers Market! David sells grass fed Beef at the JV Ranch booth. Fun fact: the ranch has been in the family for well over 100 years! At the moment it’s looking like Zach and I will get it when David is done with it.
Ivy and Grandpa David
 

While I was at the farmers market I bought a bunch of fresh fruits and veggies, I also bought a tomato plant to put a

Topsy Turvy that I found up at the ranch.


I hope it works! I also bought  an oregano plant, I’m trying to grow my own herbs because they can get so expensive in the store! I bought rosemary seeds the other day that I will plant tomorrow!
 

Update on the No Excuse Workout from yesterday, I actually felt it today! Who would of guessed that a 6 minute workout could do that much! I am defiantly keeping up with this!

I didn’t end up cooking or baking anything today, but I do have a great summer dessert recipe that I made a few weeks ago that Zach says “O my gosh this is the best dessert you’ve ever made!) I decided not to make the cake from scratch because with my little one I don’t always have that much time, and it takes A LOT of egg whites!

This is the beautiful Picture from browneyedbaker
 
Angel Food Cake Log

  Ingredients

1 package (16 ounces) angel food cake mix, plus ingredients to prepare mix

The Filling:
2 cups heavy whipping cream, chilled
6 tablespoons powdered sugar
1 teaspoon vanilla extract
3 cups diced strawberries

Powdered sugar, for dusting top of cake (optional)

Directions:

1. Preheat oven to 350 degrees F. line bottom of 15x10 inch jelly-roll pan with waxed paper. Prepare cake mix according to package directions; pour evenly into prepared pan. Bake 20 minutes or until cake is golden brown and springs back when lightly touched. Cool on wire rack 15 minutes.  

2. Place clean kitchen towel on flat surface. Sift ¼ cup powdered sugar over towel; flip the cake onto the towel. Gently peel off waxed paper. Roll up cake in the towel jelly-roll style, starting with a short side. Cool completely, seam side down, on a wire rack.

4. Meanwhile, in a medium bowl, beat the cream on medium speed until it begins to thicken. Add powdered sugar and vanilla; increase the speed to medium-high and beat until soft peaks form. Gently fold in the strawberries. Store in the refrigerator until ready to use.

5. Unroll cooled cake; spread filling to within ½-inch of edges (you will have some filling leftover). Roll up again. Place seam side down on a serving plate; sprinkle with additional powdered sugar, if desired. Serve with any leftover strawberries and cream filling. Store leftovers, covered with plastic wrap, in the refrigerator.
My finished product!

This recipe is adapted from The cake mix bible and  The Brown Eyed Backer.

This was a relatively easy dessert that definitely has a wow factor! I am no dubitably making this again, maybe if we ever have a house worming party... I was not even hard to make it look like the original photo!

Any Questions or comments feel free to post and I will get back to you ASAP! I am also more then happy to help walk you though this if the instructions are not enough. Hope you all have a great Memorial Day Weekend!

Friday, May 24, 2013

6 min workout and Chickpeas


Today is the day that Zach left for his mini deployment, the reason I say mini would be because, he is still in the US and it is (hopefully) for a month. I don't want to compare it to the long overseas deployments. Although this will be the longest that we have ever been apart.

With that all said, after almost a year hiatus I am going to try the blog again! (Wish me luck!) When I started last time my computer broke the day I started and a few months later we welcomed little Miss Ivy into the world! Now Ivy is 8months old, and goes to bed at about 7pm every night, no idea how I lucked out with that!

I have decided that while Zach is gone I am going to try and shed some of the excess baby weight! With Pinterest at my fingertips, I have high hopes! I will admit however today started as a lazy day… My soldier had to be out of the house at like 3:30am, so I was a bit on the sleepy side…

 
This afternoon however was slightly more productive. I found this great Excuse Proof Workout click on the link for more detailed instructions!  

 
It even worked up a lil sweet! I think I will do it again before bed! Motivation here I come!
For a snack today I made Roasted Chickpeas, I went to Costco the other day and bought a case of chickpeas sooo this was a great thing for me to make! I decided to go with the Parmesan and garlic because I am a sucker for cheese... and garlic...  I had all the ingredients on hand, which made it that much more perfect! I even have Annie's Naturals Roasted Garlic Olive Oil, which is AMAZING!!


Ingredients
  • 2 cans chickpeas (garbanzo beans) or about 4 cups cooked chickpeas from dried beans
  • 2 tablespoons olive oil
  • seasonings of your choice (see below for suggestions)
Directions
 
  1. Preheat oven to 375 degrees. 
  2. Prepare the beans for roasting by draining and rinsing them, then letting them dry on a towel until most of the excess moisture is absorbed. Spread on a baking sheet lined with parchment paper or a silicone baking mat. Roast the chickpeas in the oven for 45-60 minutes or until the beans are crunchy throughout (just test one- if they are still mostly soft on the inside and there’s no crunch, keep baking).
  3. Immediately (while beans are still hot), toss with olive oil and seasonings. Serve hot or at room temperature. They are best the first day, but can be kept in an airtight container for up to 4 days.
Seasoning Suggestions (add more or less if you like, these are just guidelines)
  1. Sesame Soy- 1 teaspoon sesame oil, 1 teaspoon garlic powder, 1/2 teaspoon sea salt, 1 tablespoon sesame seeds
  2. Honey Cinnamon- 1 teaspoon cinnamon, a pinch nutmeg, 1/4 teaspoon sea salt, 2 tablespoons honey (you can throw these back in the oven for 10-15 minutes to carmelize if you like)
  3. Garlic Parmesan- 1/4 cup grated parmesan cheese, 1 teaspoon garlic powder or 2 cloves fresh minced garlic, 1/4 teaspoon fresh cracked pepper, 1/2 teaspoon sea salt
  4. Smoky Spice Blend- 1/2 teaspoon ancho chile powder, 1/2 teaspoon smoked paprika, 1/2 teaspoon garlic powder, 1/2 teaspoon cumin, 1/4 teaspoon fresh cracked pepper, 1/2 teaspoon sea salt, pinch cayenne (optional)


I am Excited to try some of the other flavors!
Here are photos of my finished product.


I thought that these were easy to make, the cook time for me took over an hour, but I have a questionable oven so there is a high probability it wont take as long for others. I think I will try some of the other flavors because I am always eating snacks and I really need healthy ones! I think it might even be good on a salad. 

If you have any questions or comments please let me know! I also have a board on my Pinterest page that has food that I have actually made, some are fantastic others not so much... If you have any recipes you would like me to try let me know! Thanks for visiting!
~Tarcy